How to Convert JPG and PNG to WebP Without Uploading Your Images
A practical guide to choosing image quality, resizing, and converting JPG or PNG files to WebP in your browser—with a checklist for better results.
A website image has two jobs: look right and arrive quickly. A huge photograph can make a simple page feel slow, while aggressive compression can leave screenshots and product images looking rough. The useful target is a smaller file that still does its job.
This guide walks through converting JPG and PNG files to WebP with dotwebp’s image-to-WebP converter. You can choose your settings, convert in your browser, and download the result without uploading the source image to a conversion server.
JPG, PNG, or WebP: which one should you use?
These formats solve different problems. JPEG uses lossy compression and is a common starting point for photographs. PNG uses lossless compression and supports transparent backgrounds. WebP supports both lossy and lossless compression, as well as transparency; the final result depends on the encoder and settings.
Format | A useful starting point | What to check |
|---|---|---|
JPG / JPEG | Photographs and existing photo libraries | Compression artifacts around fine detail; no transparent background. |
PNG | Screenshots, diagrams, logos, and transparent originals | Whether the file is larger than it needs to be for its display size. |
WebP | An image you want to prepare for a web page | Visual quality, transparent edges, dimensions, and the actual output file size. |
Converting to WebP can reduce file size, but it is not a guarantee. A well-optimized source may already be small. Compare the actual download rather than assuming a different extension automatically makes it better.
Convert your first image in dotwebp
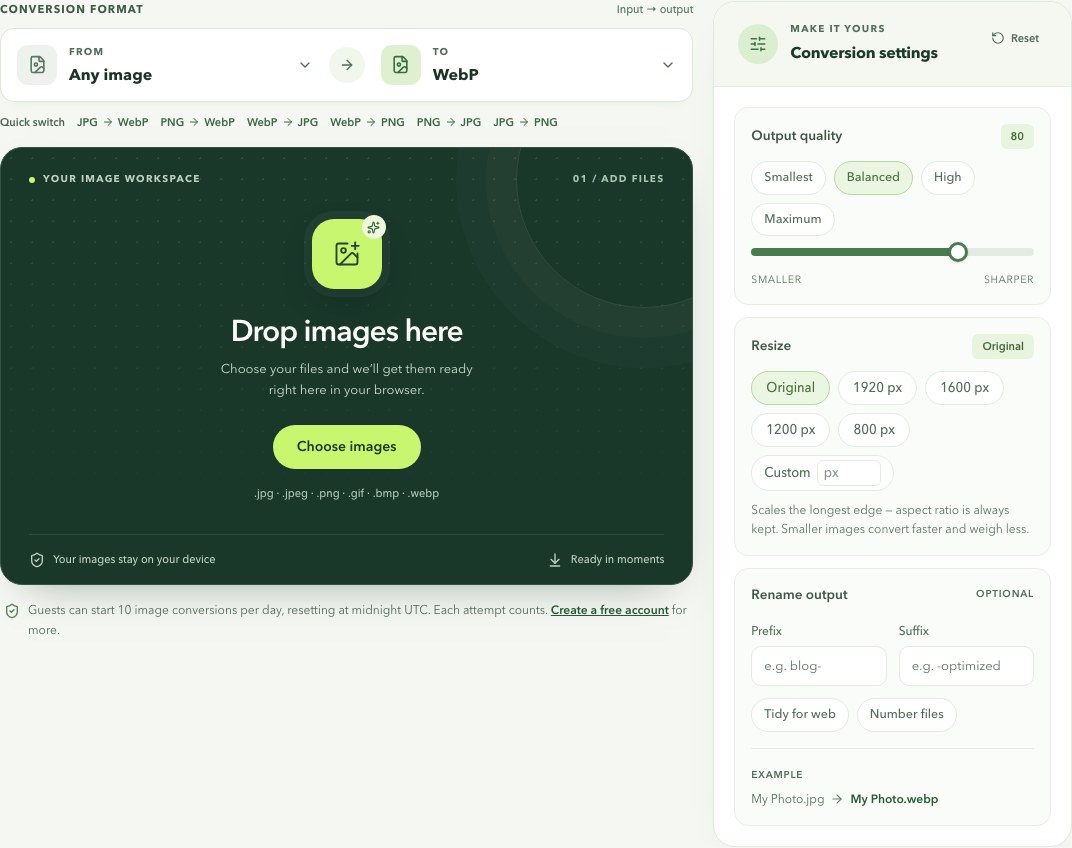
Open the right tool. Use JPG to WebP for JPEG photographs or PNG to WebP for PNG files. For a mixed batch, open the image-to-WebP converter.
Choose settings first. The converter starts automatically when you add files. Set the output quality before choosing your images. The default value of 80 is a practical place to start, then inspect the result.
Set dimensions and names. Keep Original when you want to retain the dimensions, or set a longest-edge limit when the image will appear smaller. Use the rename controls if you need a consistent prefix or suffix.
Add your images. Drop them into the workspace or choose files from your device. Processing happens in your browser; keep the page open while the queue runs.
Review and download. Check the completed result and its file size. Download one file or use the batch ZIP download when working with several images. Keep your originals until you are happy with the exports.
Find the right quality for the image
For a photograph, inspect faces, gradients, and textured areas. For a screenshot, look at small letters, thin lines, and interface icons. If the result looks rough, try a higher quality value. If it looks good but remains large, consider resizing to the dimensions your page actually needs.
The quality slider controls the browser encoder. A setting of 100 does not promise a lossless WebP export, and changing the filename extension cannot recover detail that was already lost in the original.
Check the result before publishing
Compare the original and export at the intended display size.
Check small text, fine edges, and any transparent background.
Confirm the exported dimensions and file size suit the page.
Use a descriptive filename and write useful alternative text when adding the image to your site.
The best export is the smallest file that still looks right for the job. Keep the original, measure the result, and let the image decide.
Add the image to your website
If you manage a website’s HTML, a picture element lets you offer a WebP file with a JPEG fallback. The example below uses matching dimensions and descriptive alternative text. Replace the paths, dimensions, and description with your own.
<picture>
  <source srcset="/images/mountain-trail.webp" type="image/webp">
  <img
    src="/images/mountain-trail.jpg"
    alt="A walking trail winding between green mountain slopes"
    width="1200"
    height="800"
    loading="lazy"
  >
</picture>
This example is for an image farther down a page. Choose loading behavior to suit the placement rather than copying lazy loading onto every image. If your website builder manages image markup for you, upload the export through its normal media workflow instead.
What stays on your device?
For dotwebp’s conversion tools, the source image and converted output are processed on your device. Signing in can record a completed-conversion count for your dashboard; it does not upload the source image as part of conversion.
Guests can start 10 image conversion attempts per day, with the cookie-based allowance resetting at midnight UTC. Each attempt counts, including an unsuccessful one. Create an account or sign in to continue beyond the guest allowance.
Ready to make your next image lighter?
Try one representative image first. Once the quality and dimensions look right, use the same approach for the rest of the batch. You can also resize an image or use Screenshot Studio when your next task is preparing an annotated screenshot.
Further reading
EXPLORE THE TOPICS
Ready to put it
into practice?
Make your next image lighter, right in your browser.
Explore image tools